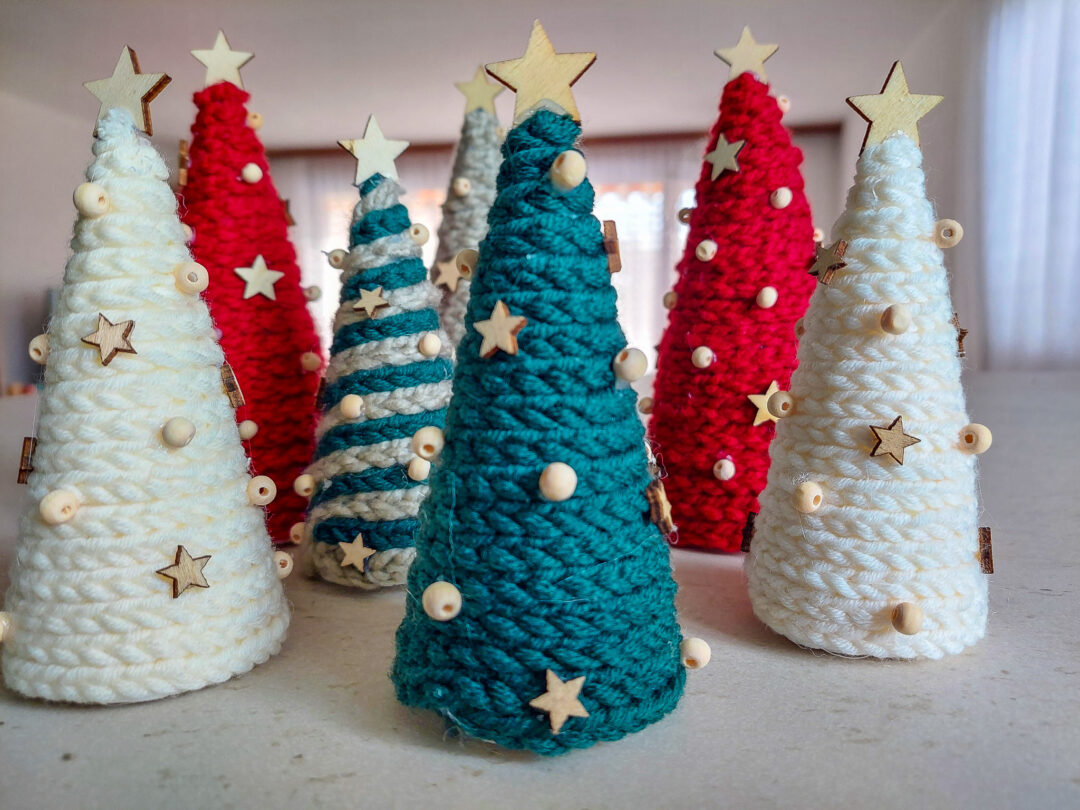
These simple and elegant Christmas tree decorations are easy to make and look delicate and beautiful on a Christmas mantel or wintery windowsill!
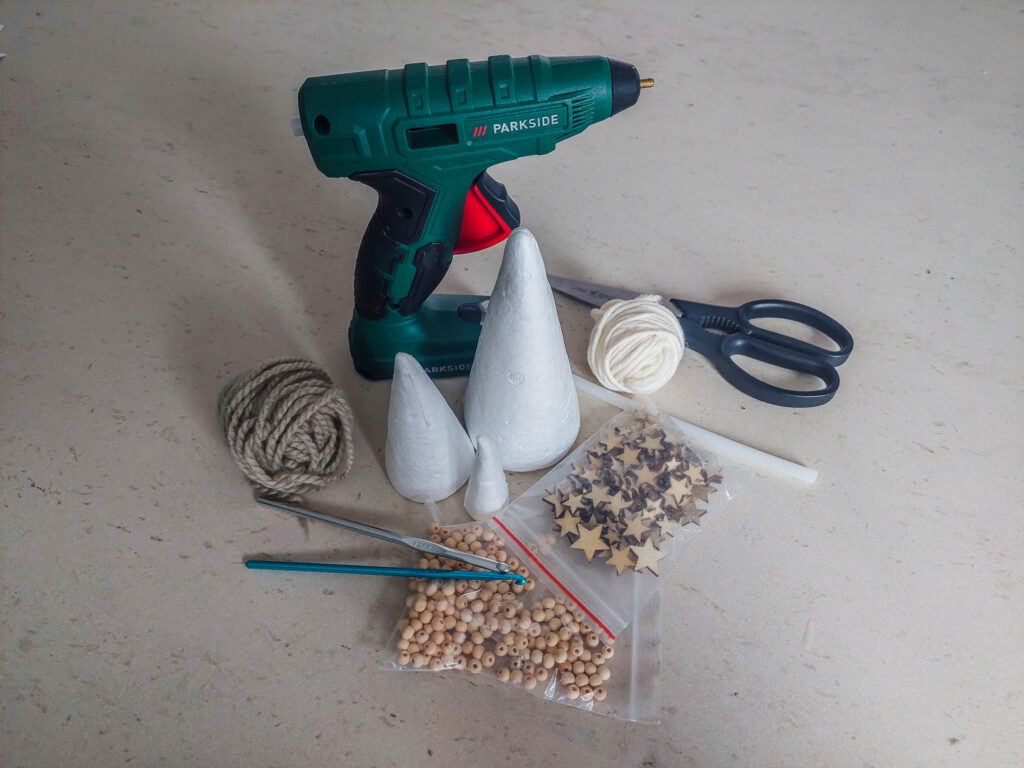
Supplies
Different colors of yarn depending on how many trees you decide to make,
styrofoam cones (varying sizes),
wooden stars and beads,
hook (size depending on the thickness of the yarn),
hot glue gun,
silicone sticks,
scissors.
How to make a simple DIY Christmas decoration step by step
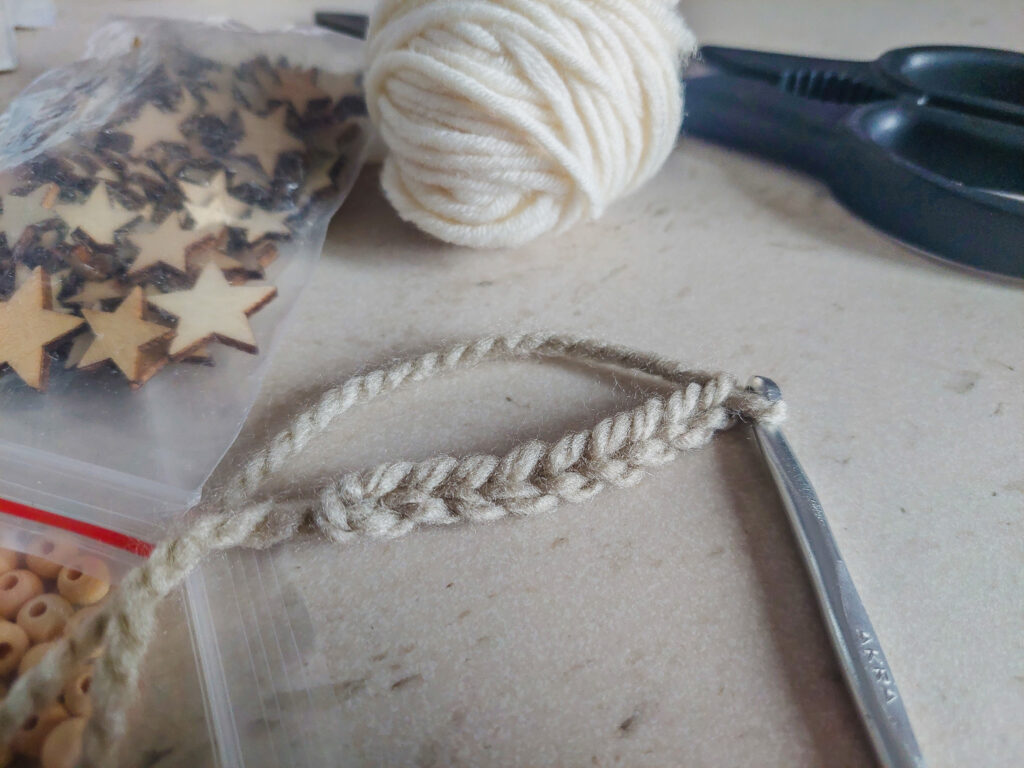
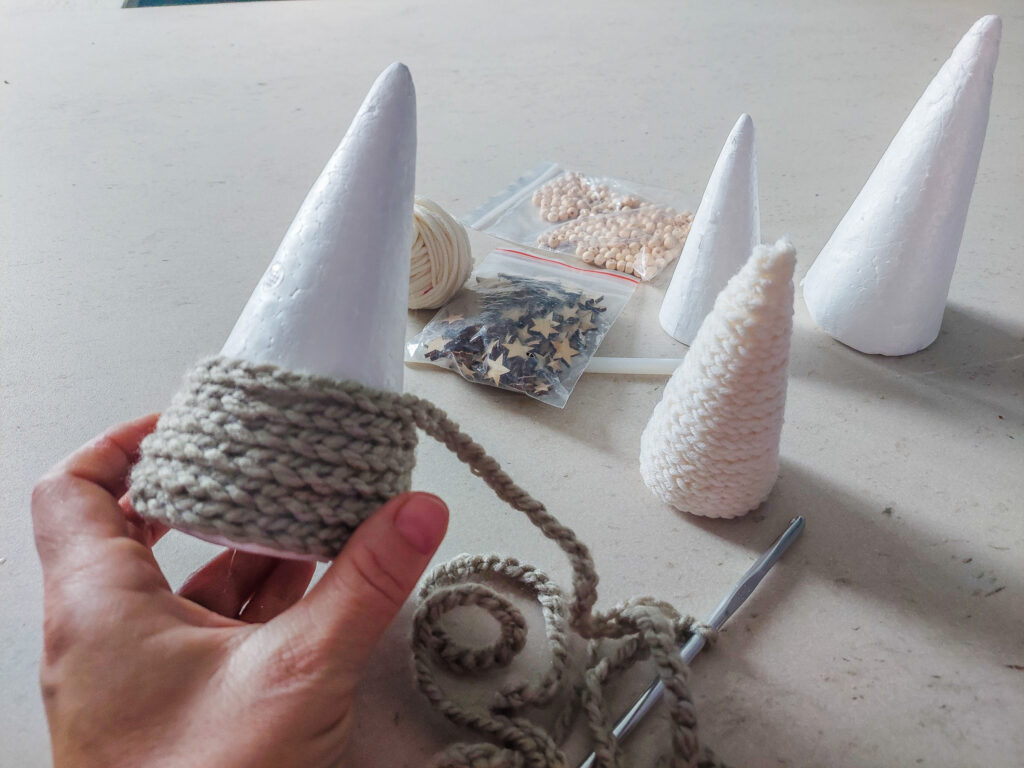
Step 1 – crochet a chain
You crochet a chain long enough to wrap around the entire styrofoam cone.
Step 2 – wrapping the form with yarn
Heat your hot glue gun. I put a drop of glue on the beginning of the chain to hold it in place and then started wrapping the cone from the bottom up. For every few loops of chains, apply a small drop of glue to hold the yarn in place.
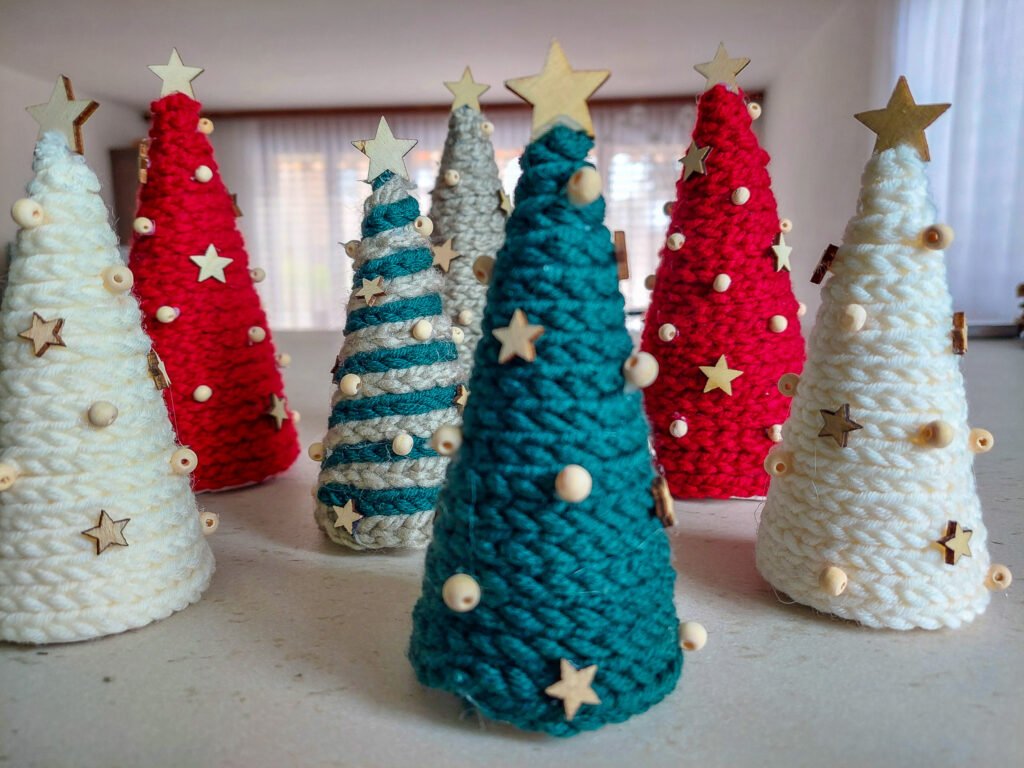
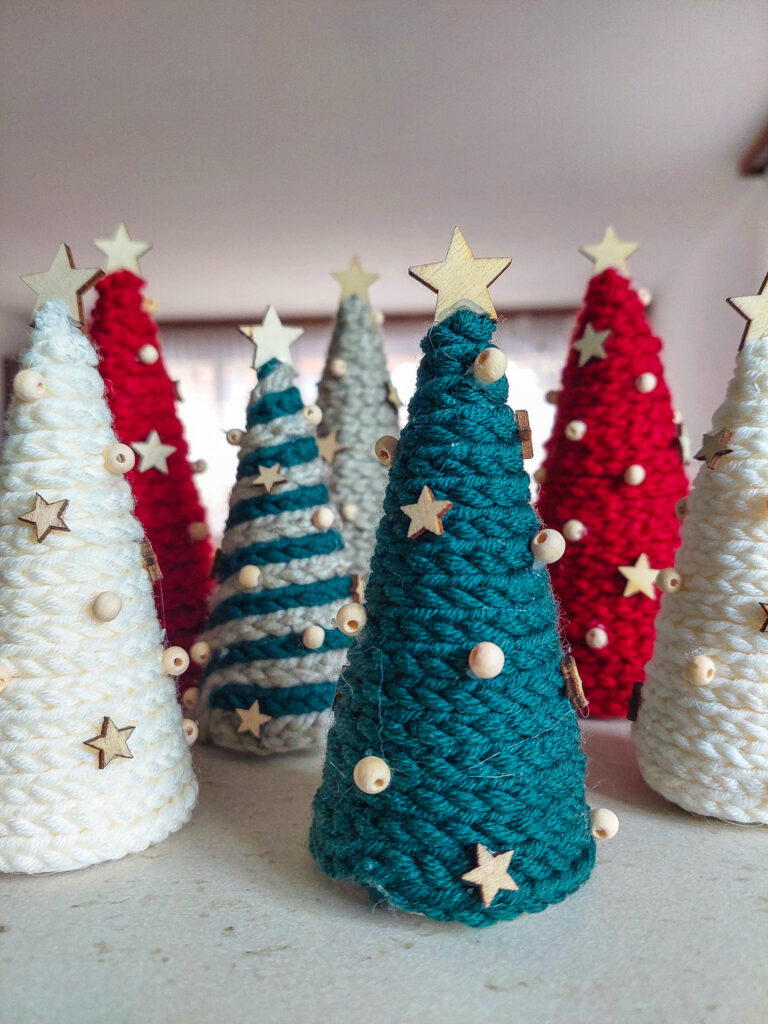
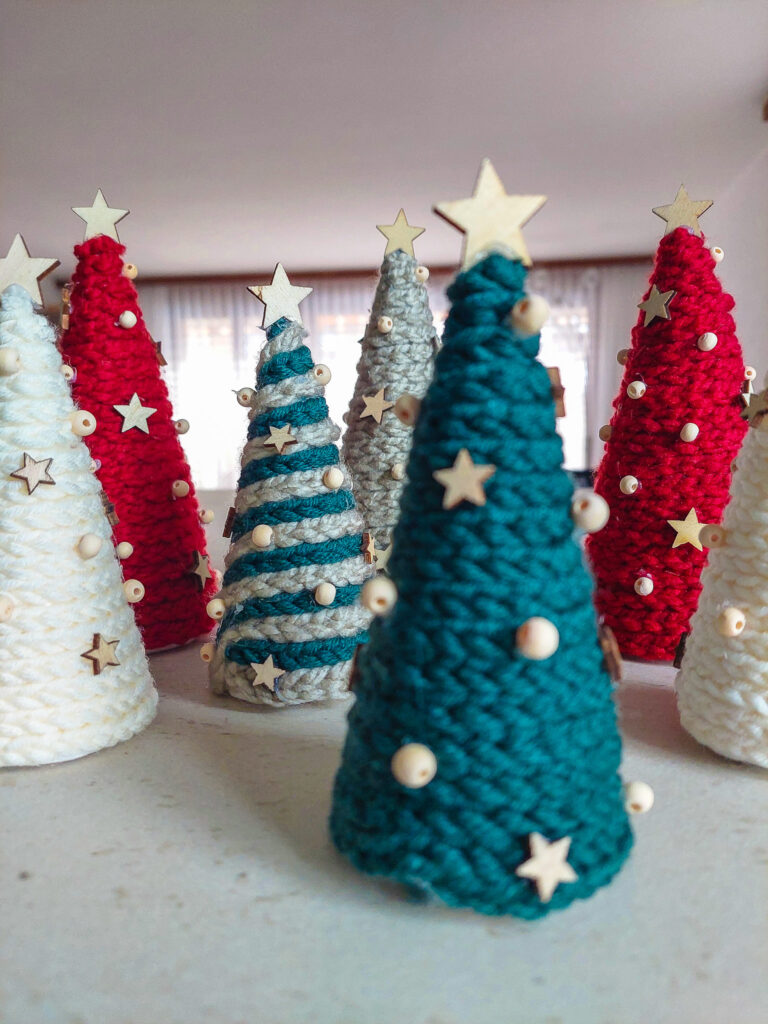
Step 3 – decorating
At the end you can decorate the trees – I used small wooden beads and stars, but there is no limit to your imagination 🙂
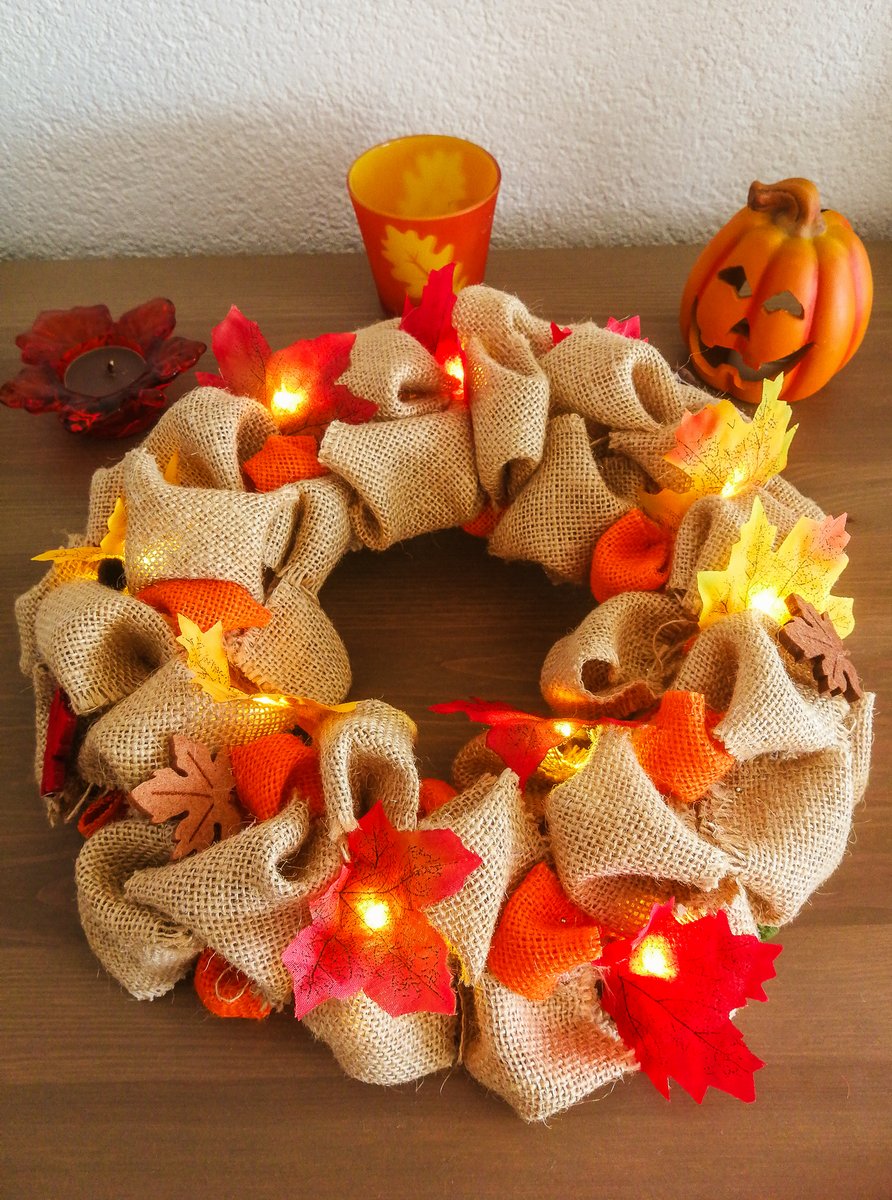
Last year, I ultimately gave up on creating any new fall decorations because of the upcoming move. But this year, I felt the urge to create something new again, especially since I found a lot of unused “fall” material during the move. The idea for another wreath started to form in my head. I bought a few more things, and off I went!
If you want to check out what its predecessors looked like first, you can here:
Small decorative items (pompons, pumpkins, leaves…)
Step-by-Step Tutorial
Step 1
A detailed description (including photos) of how to create jute bubbles can be found in this Easter Wreath tutorial. The procedure is straightforward: cut the ribbon into 5x5cm squares. Take each square, fold it corner to corner to make a triangle, put a little hot glue, and stick together. Bring the sides together – put a pinch of glue to each corner, and fold both sides towards the center of your triangle – and here is your bubble.
Step 2
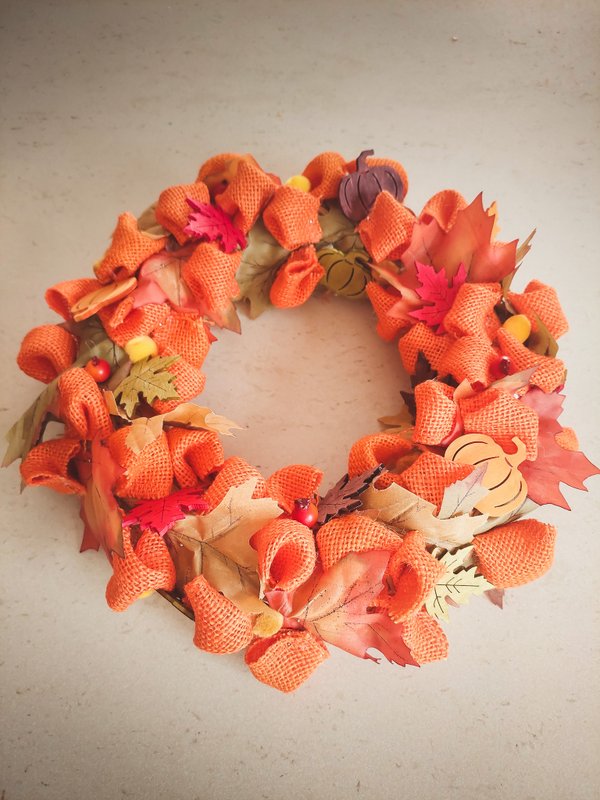
Push the pin through the bottom of the bubble and pin the “bubble” to the body of the wreath. Continue until you have covered the entire body. I didn’t have enough ribbon to cover the whole wreath, so I used fabric leaves to help me.
Step 3 – Final decoration
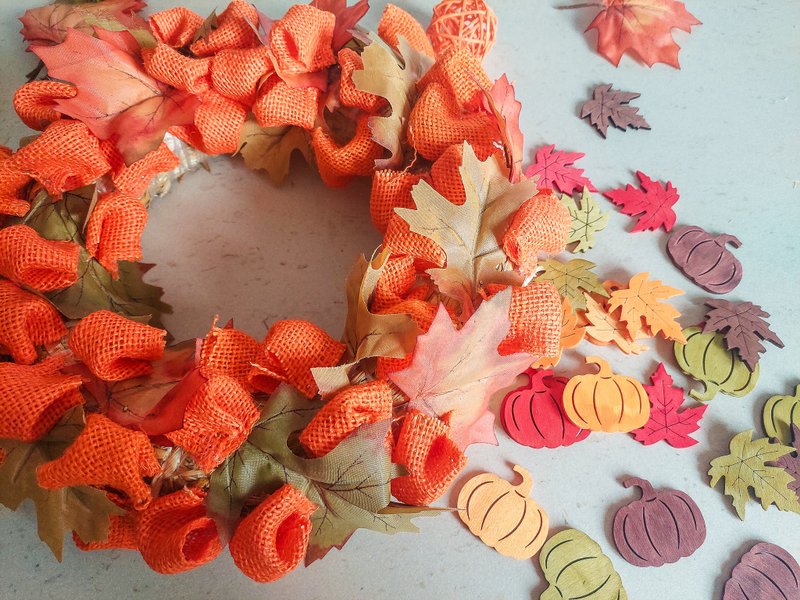
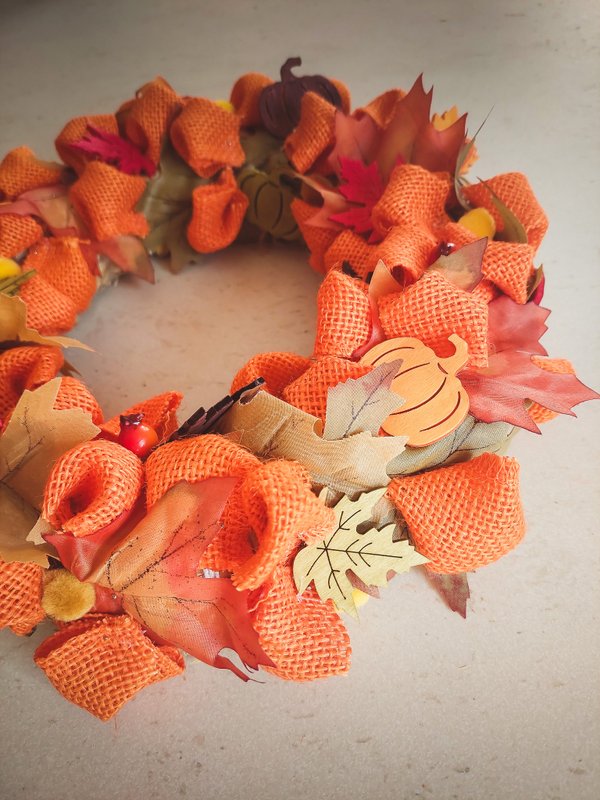
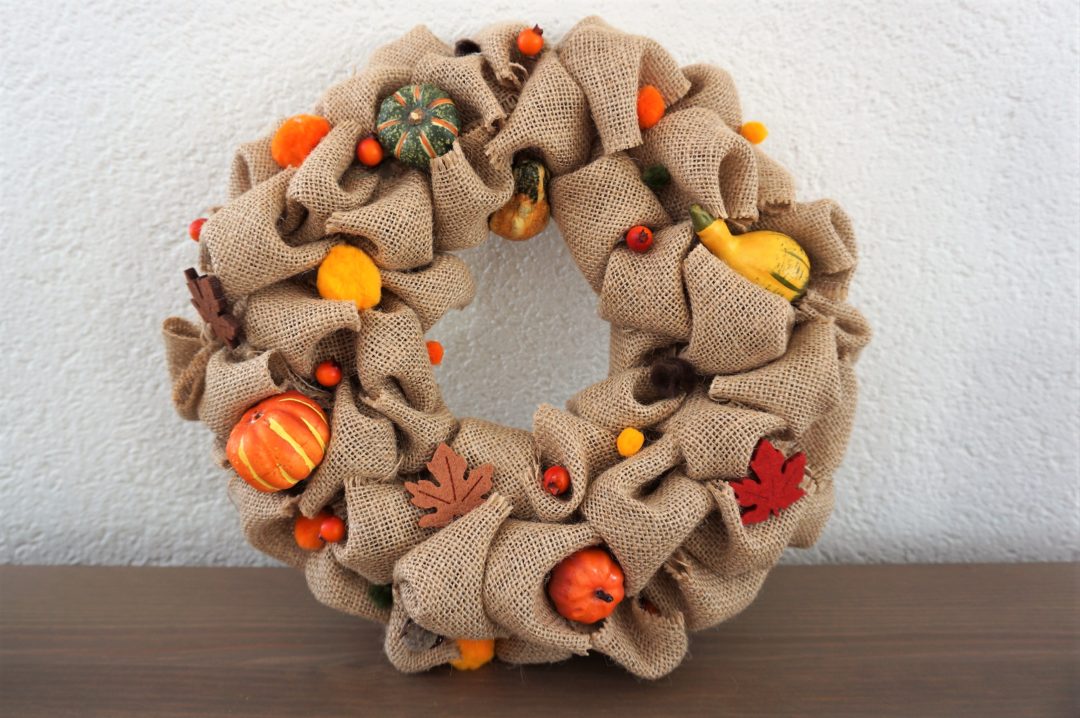
All that’s left is the final decoration to suit your taste. I got little wooden leaves and pumpkins.
And now, here’s the final result!
I hope you enjoyed this simple tutorial and if you did, I’d be happy to share it if you do. Have a wonderful autumn!
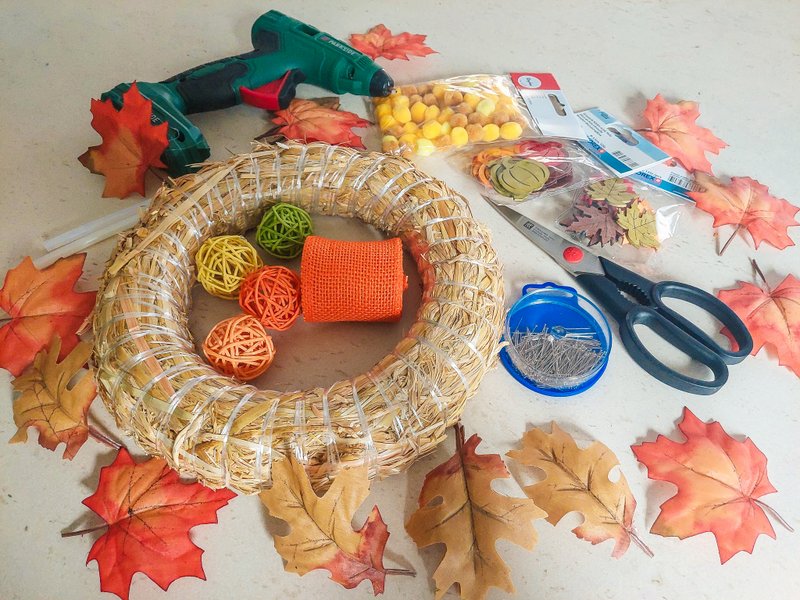
Upcycling. Or making the old new. As much as I like to buy some new fall decor sometimes, I want to think even more about how to use what we have at home. So I thought I’d take apart the fall burlap wreath I made the year before last and try to transform it a bit. In this post, I’ll show you how I went about it, and I hope you like the result.
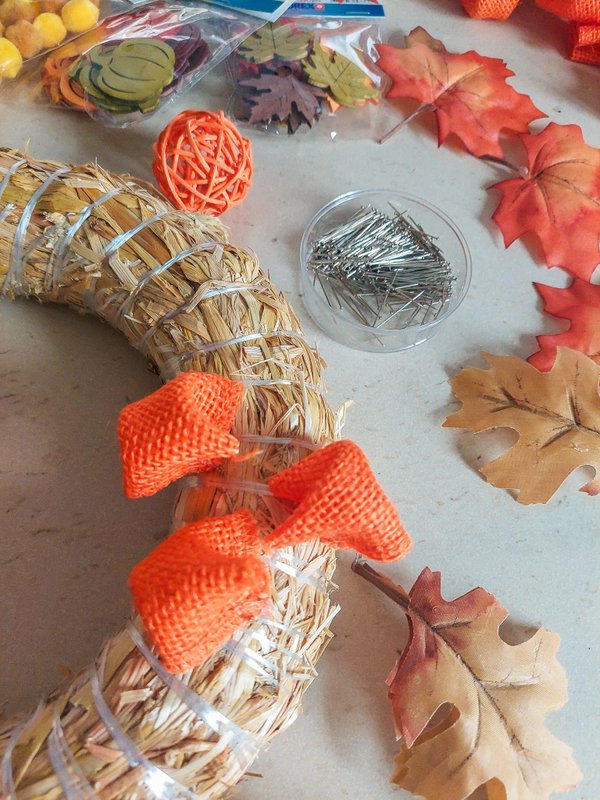
Supplies
If you already have a burlap ribbon wreath at home, you have all this supplies already. If not, and you want to make a brand-new one, you will need:
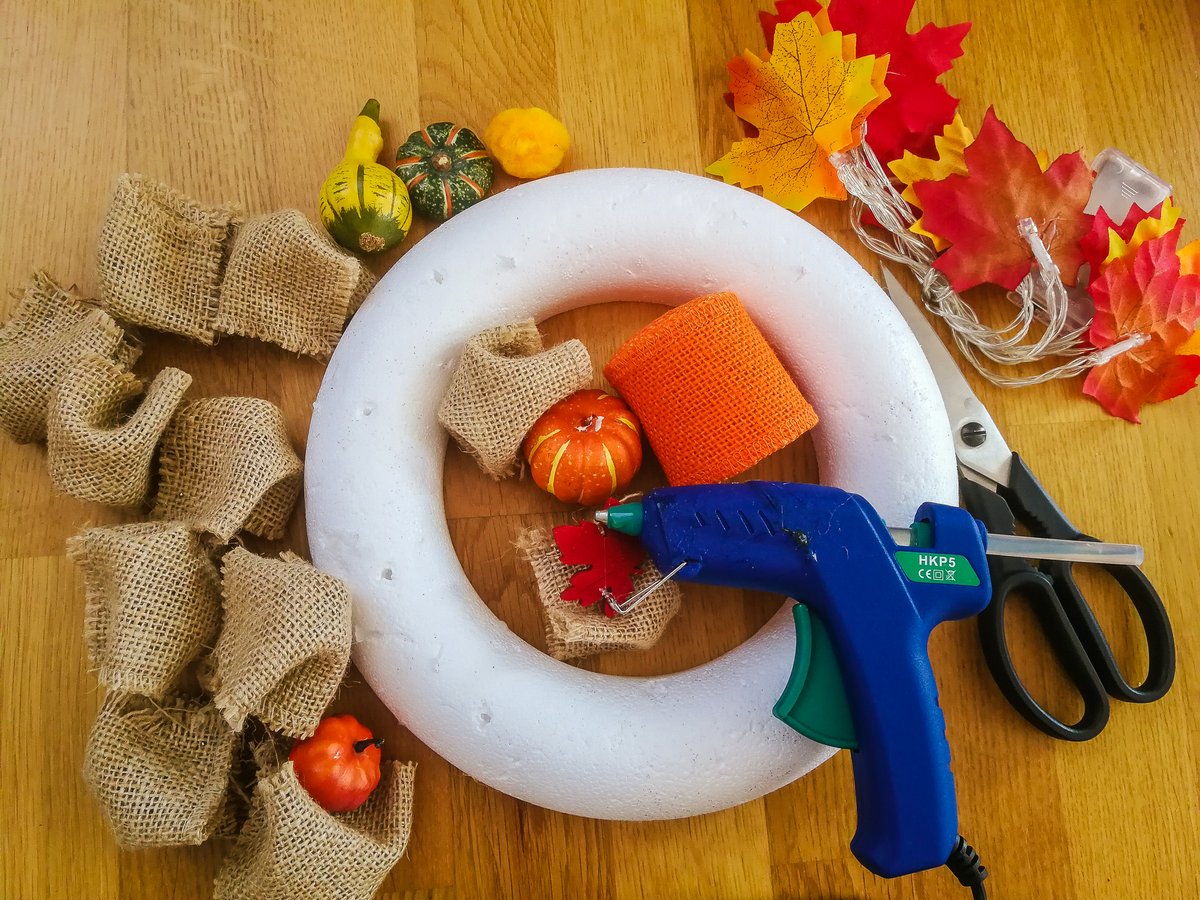
Foam wreath form (25cm diameter)
Natural Burlap ribbon (length: 5m, width: 10cm)
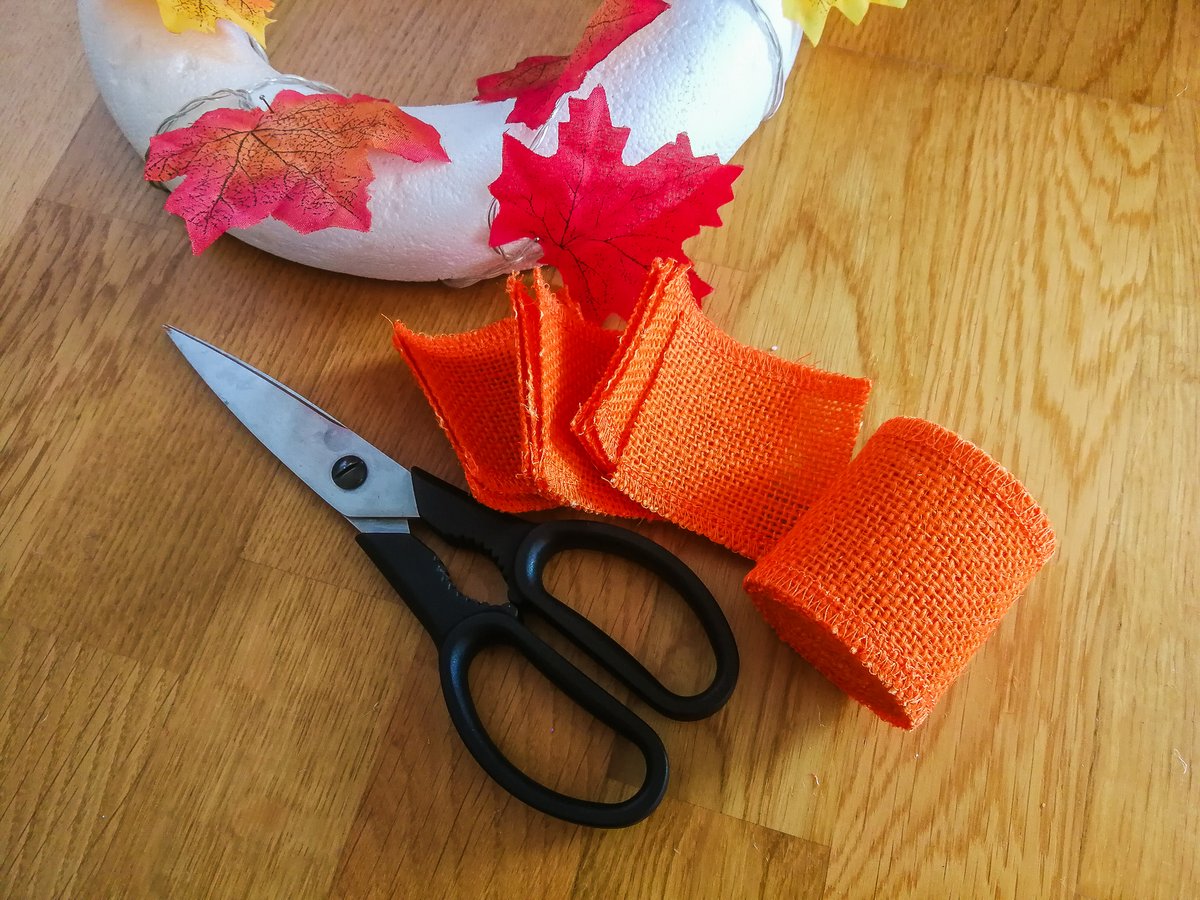
Orange Burlap ribbon (width: 5 cm)
pins with small heads
Hot glue gun & glue sticks
Scissors
Small decorative items (pompons, pumpkins, leaves…)
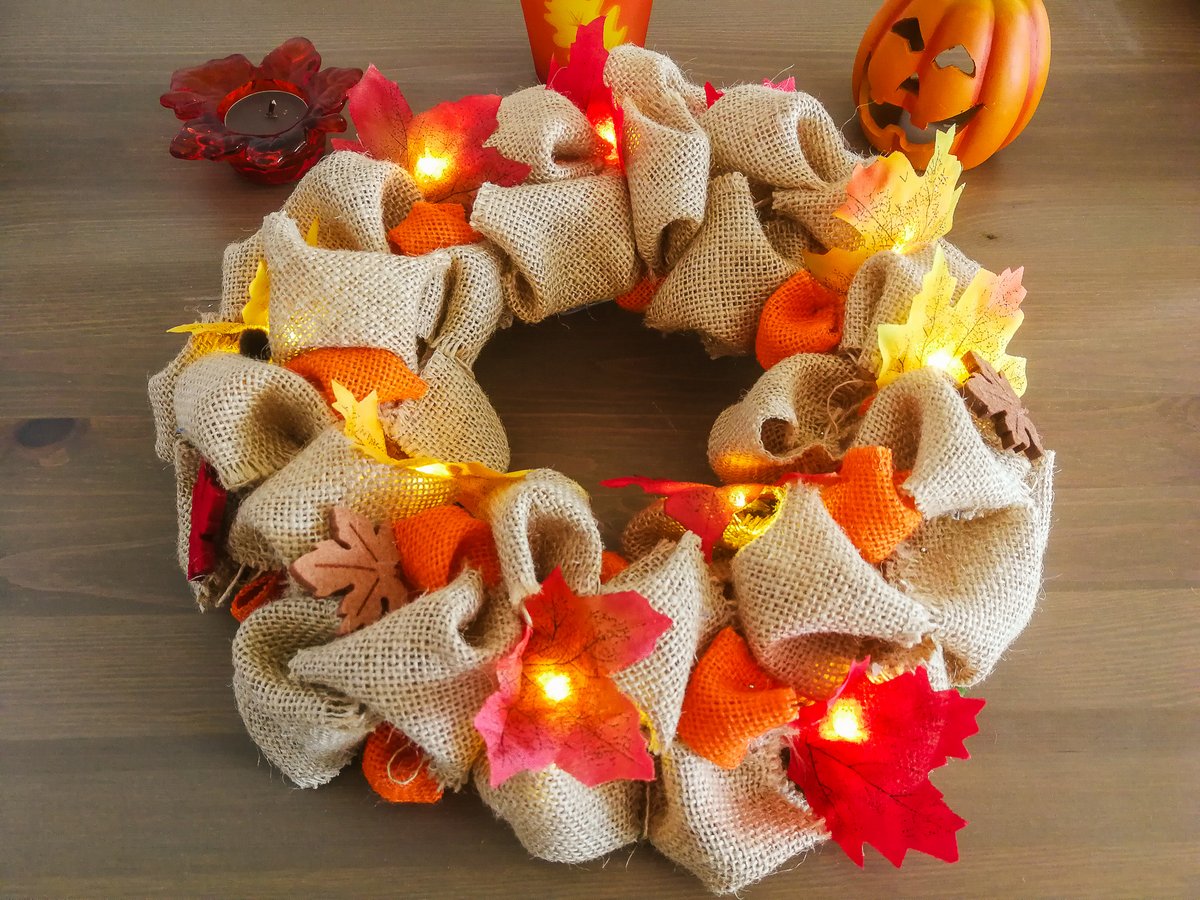
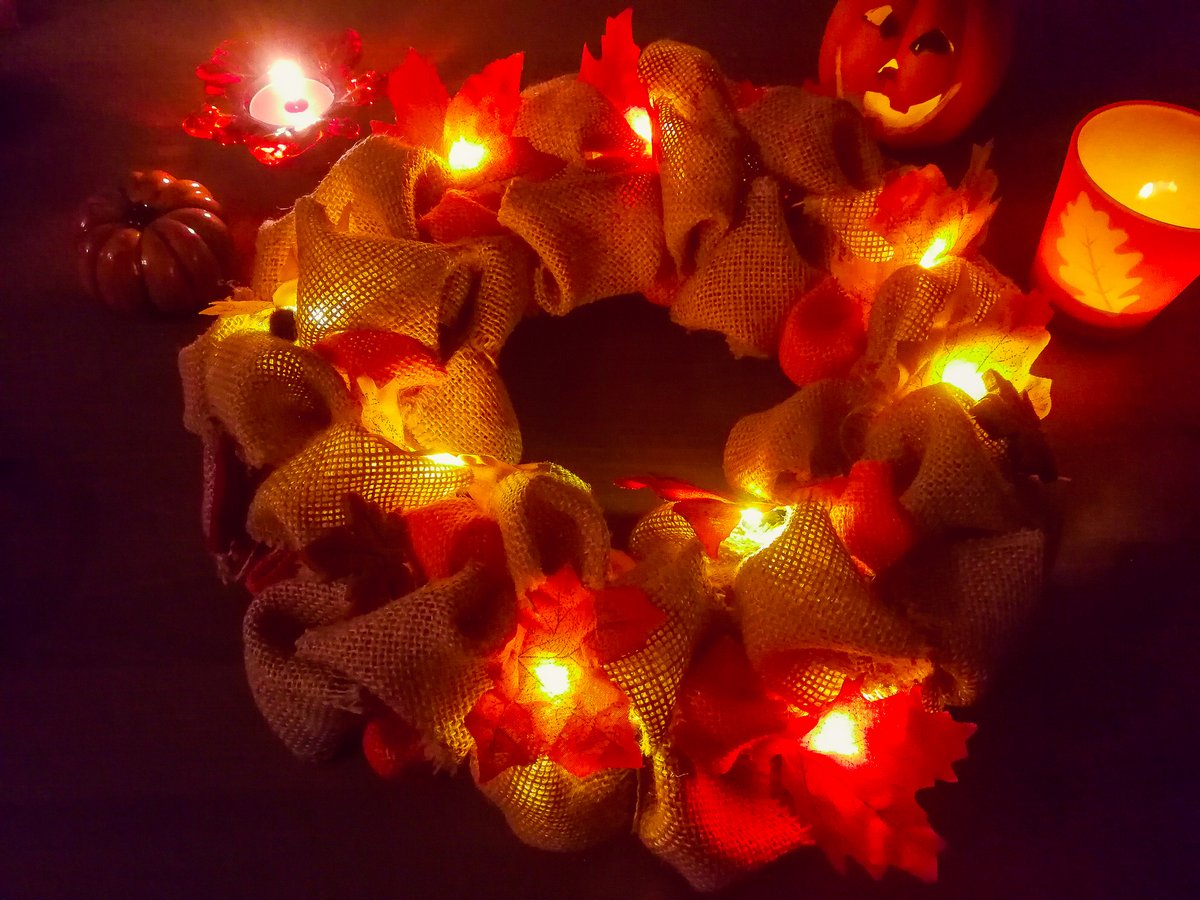
1.5m long LED lights in the shape of maple leaves (ordered via eBay), AA batteries for lights if not included
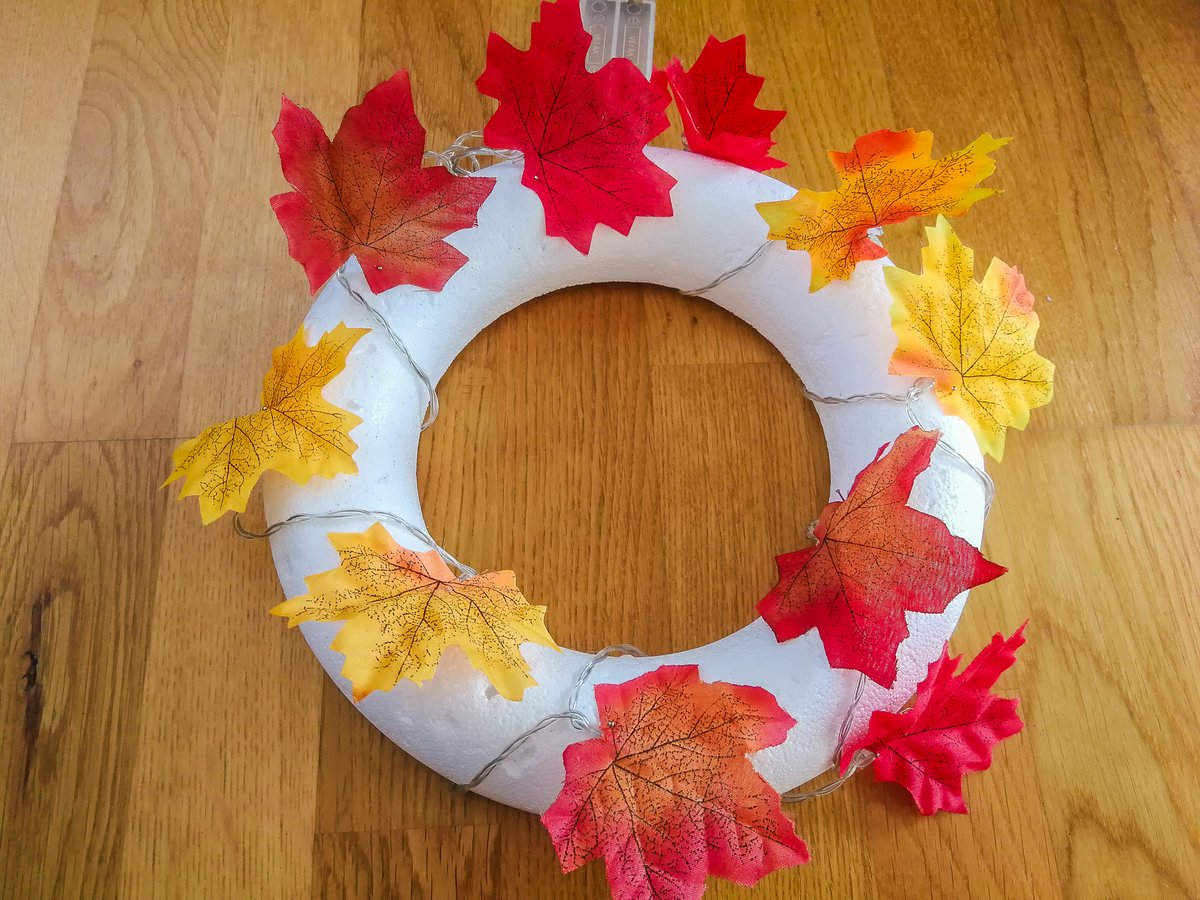
Wrap the LED lights evenly on the body of the wreath, using a pin if necessary.
Step 2
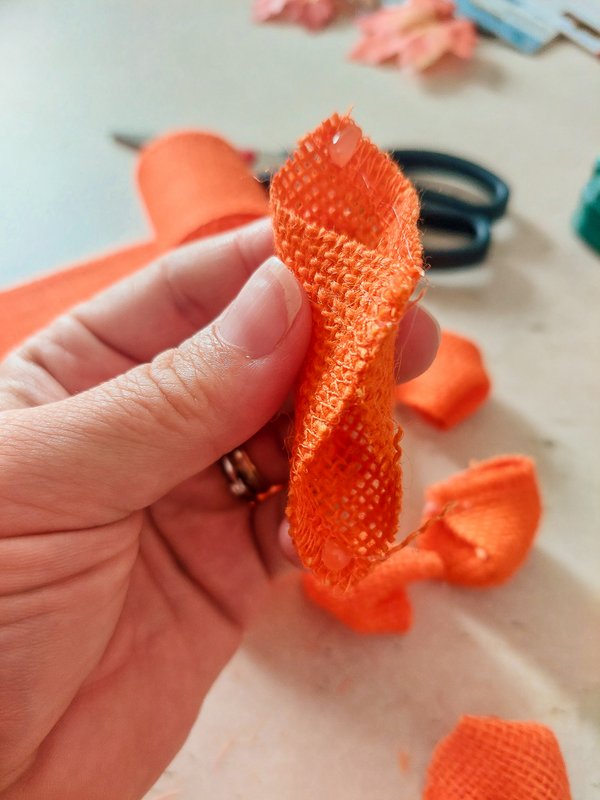
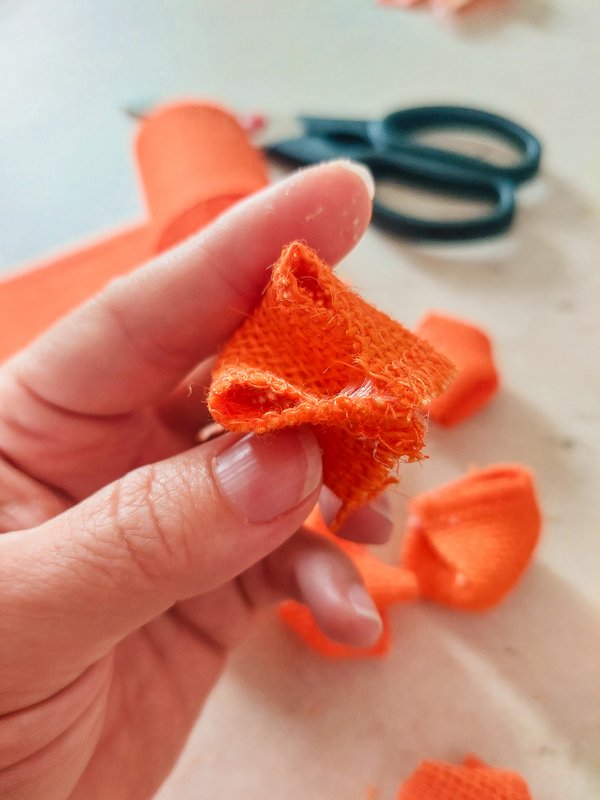
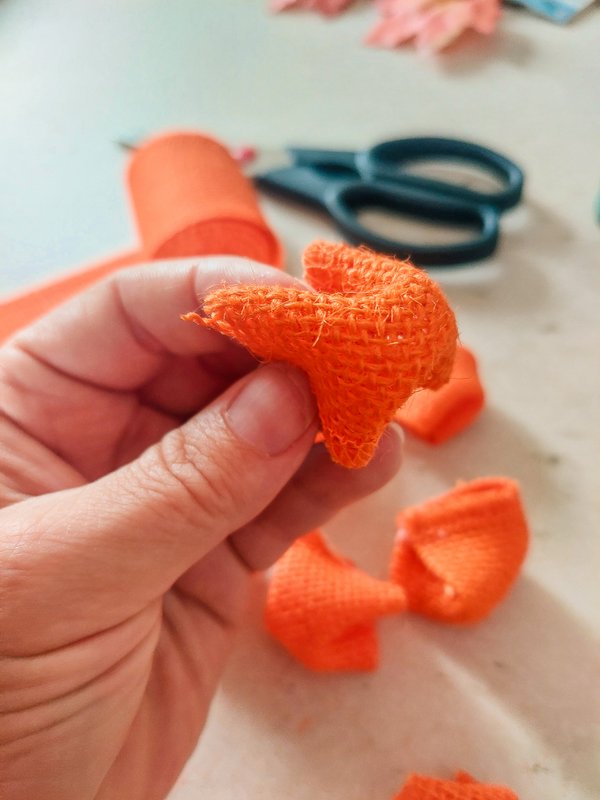
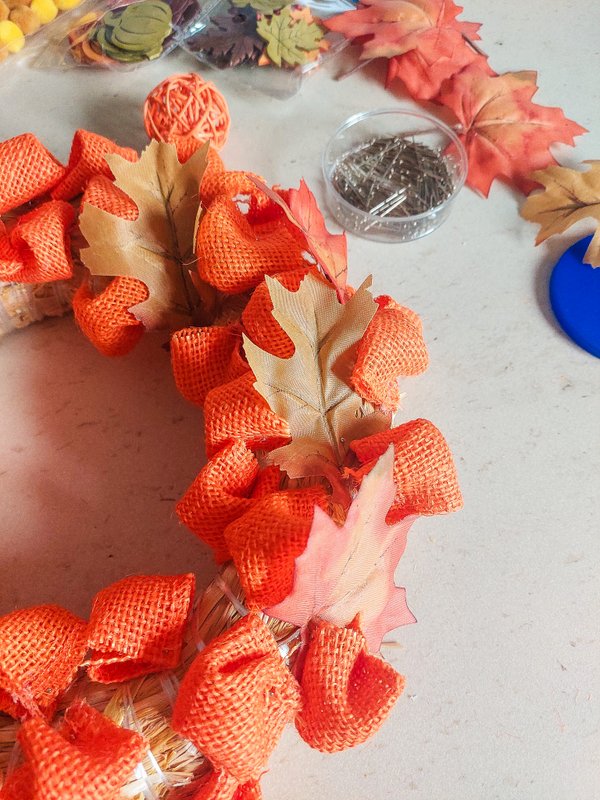
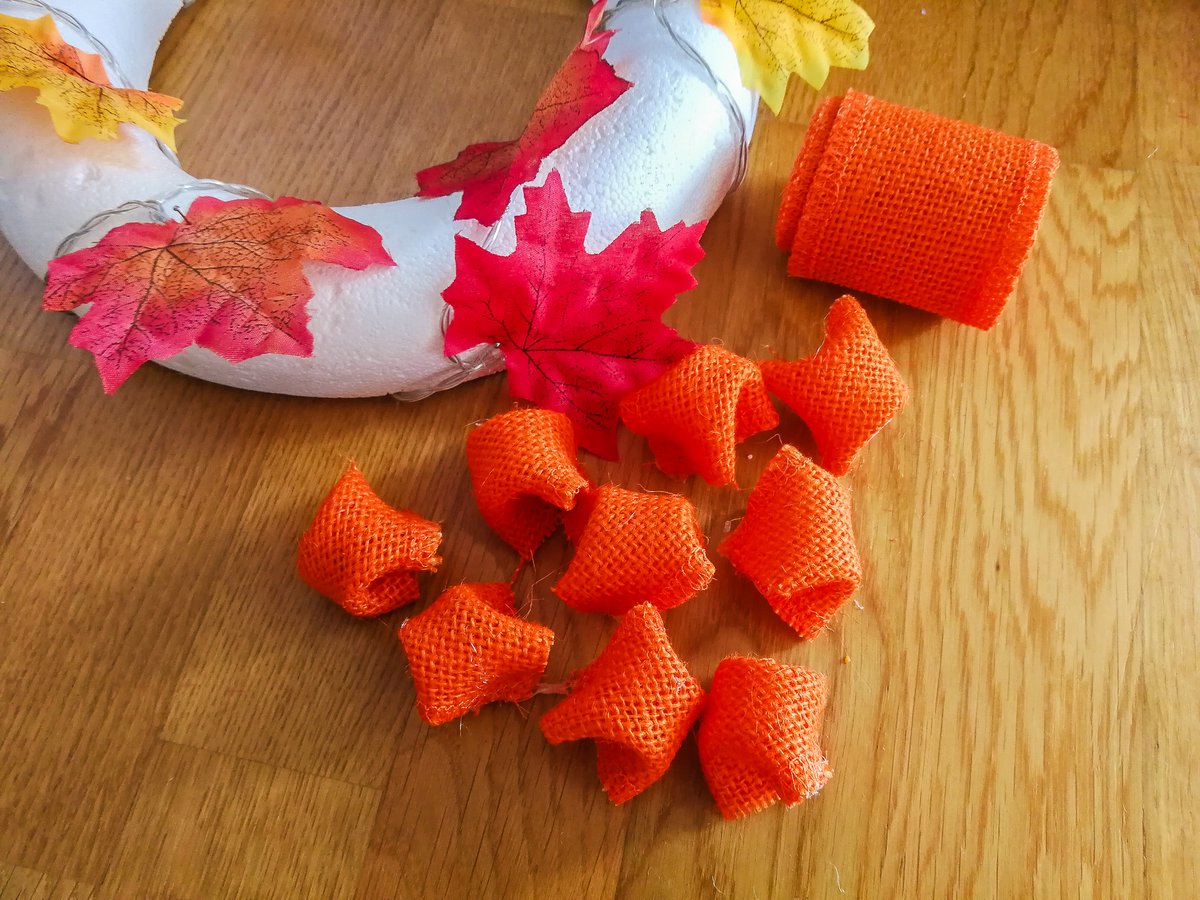
A detailed description (including photos) of how to create jute bubbles can be found in this Easter Wreath tutorial. The procedure is straightforward: cut the ribbon into 10x10cm squares. Take each square, fold it corner to corner to make a triangle, put a little hot glue, and stick together. Bring the sides together – put a pinch of glue to each corner, and fold both sides towards the center of your triangle – and here is your bubble.
Step 3
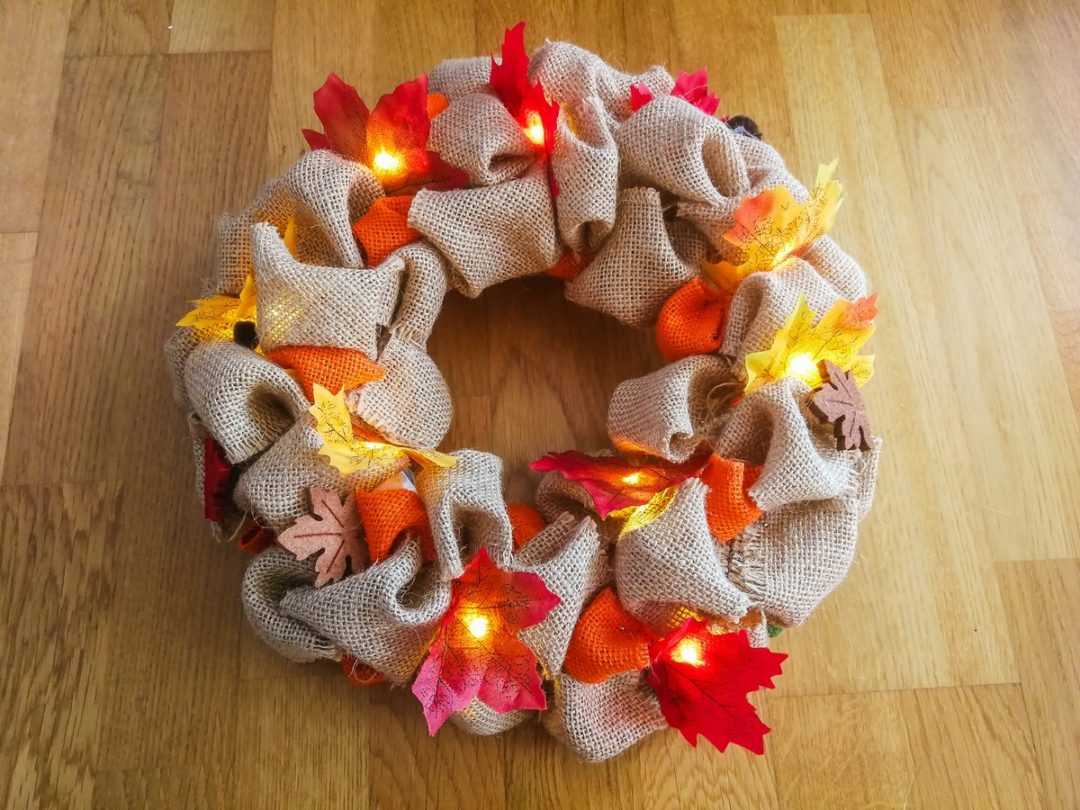
Pierce the pin through the bottom end of the bubble and pin the “bubble” to the polystyrene body of the wreath. Continue until you have covered the entire body. If the body of the wreath shines through in places, just “fluff” the bubbles or lightly cover them with LED light leaves.
I didn’t add too many other decorations to the wreath, as the large colored leaves from the lights and the colored ribbon already made it look pretty decorated. But it’s a matter of everyone’s taste 😉 .
Then, just turn on the lights And enjoy the pleasant autumn atmosphere.
I think that making a wreath from burlap ribbon is not tricky. You can take it apart again and use the bubbles for an advent wreath. What about you? Have you already finished your autumn decorations? If you liked my simple tutorial, don’t forget to share it with others and save it on Pinterest! Thank you 🙂 And have a wonderfully colorful fall!
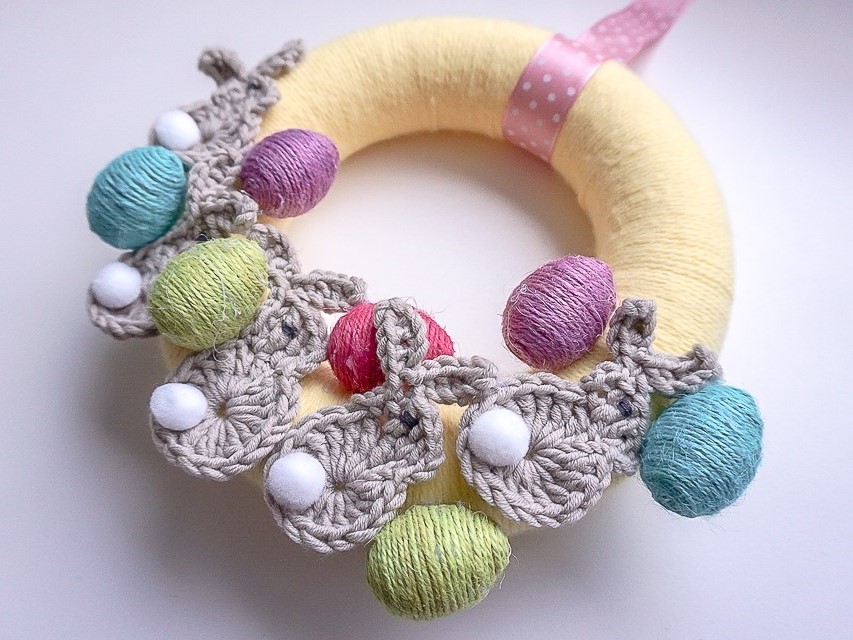
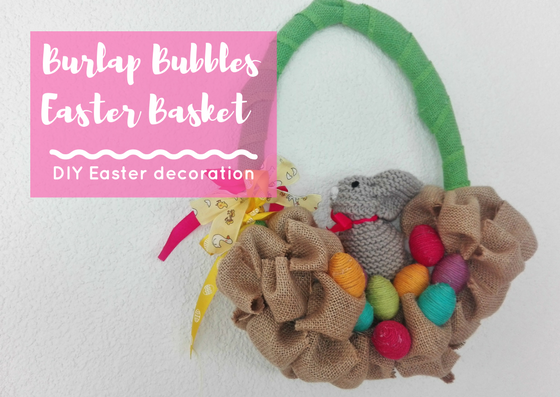
After the winter, when I was more interested in knitting hats for myself and for children, I wanted to take a crochet hook in my hand. The coincidence was that at the time I was looking for crochet inspiration, Pinterest was full of ideas for Easter decoration. When I came across a crocheted bunny tutorial, I decided to decorate this year’s Easter wreath with them. In today’s post, you can find a tutorial how to make an Easter wreath with crocheted bunnies.
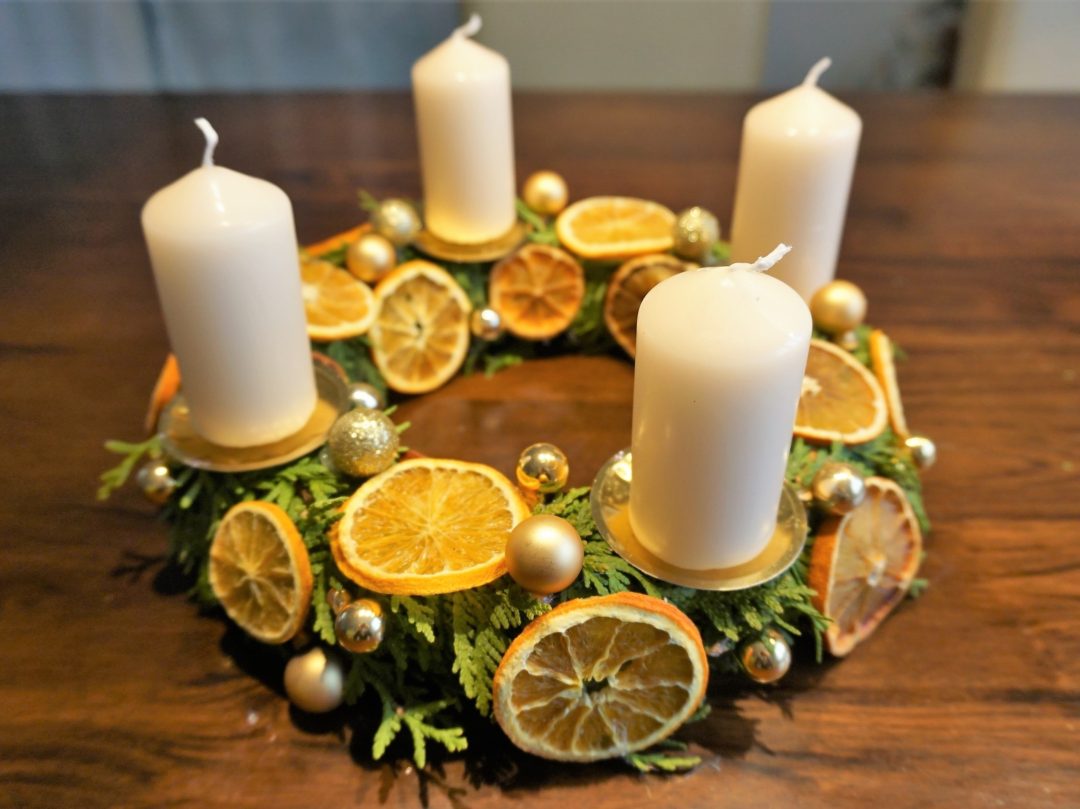
I don´t know about you, but for me, the smell of oranges is one of the loveliest smells I have ever known. When you add the scent of needles, vanilla, cinnamon … this is the real Christmas mix for me 🙂 In this post, I will show you a simple step-by-step tutorial how to make an unconventional Christmas wreath decorated with dried oranges slices.
It’s almost unbelievable, but the fall is just around the corner. And so it is high time to get into making some decorations (that I have neglected in the summer). If you read my blog regularly, you know that I have enjoyed jute creation. And since I like to use ideas that have proven themselves, I decided to make the fall wreath of burlap bubbles (you could already see my Easter and Christmas wreaths).
If you are a regular reader of this blog, you probably know that I enjoy making seasonal decorations. It´s a creative outlet for me. But the box, where I store all the decorations, is pretty full by now. I´m also well aware that the minimalism trend is currently very popular. It says one should not be afraid to get rid of unnecessary things. But somehow I´m quite reluctant to get rid of the things I created when I know I’ve spent some time making them. That’s why I was thinking of going another way. And I´ve decided to use my decoration differently, respectively to make something new from it. So in my today´s post, I will show you an easy tutorial how to “upgrade” the Easter wreath from the jute ribbon and turn it into a hanging decoration.
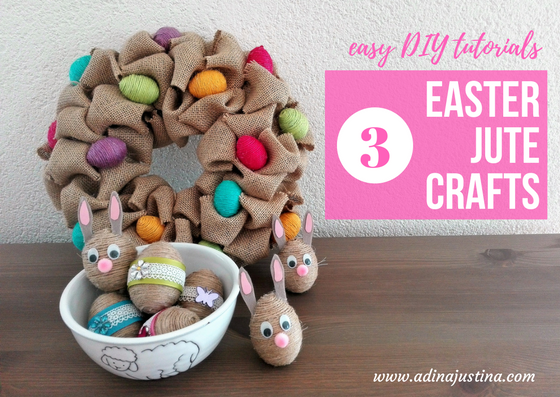
For those who like everything wrapped in neatly tied package I have prepared this post, which is a summary of my last year´s Easter jute crafts. I enjoyed working with this material very much, and surely you´ll have the chance to find more jute tutorials on this blog 😉
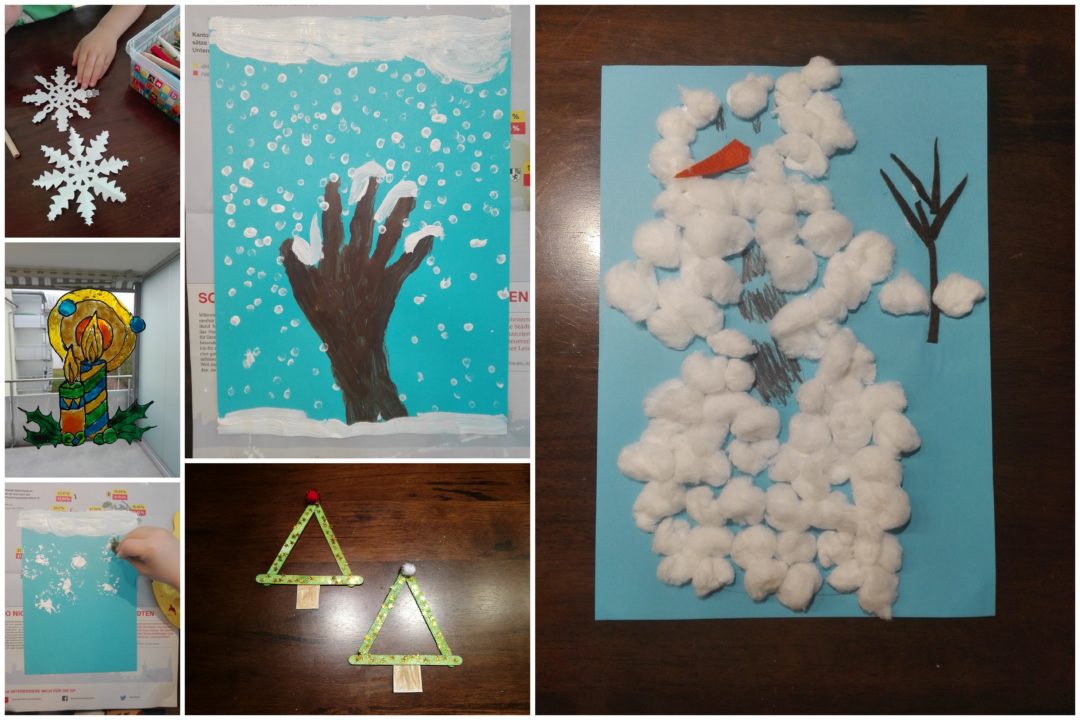
When it´s getting dark early, the winter afternoons spent at home can be quite long both for you and your children. Today, I bring you some ideas on how to entertain your children while waiting for Christmas. Continue Reading
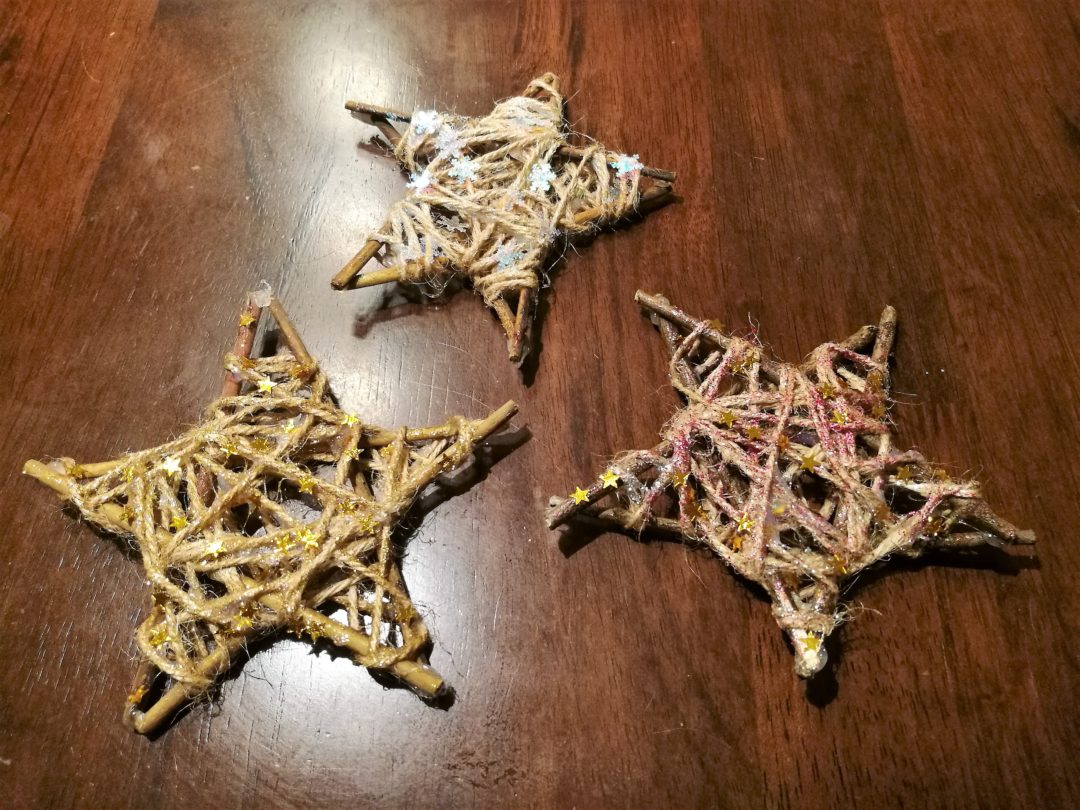
On the way from the local grocery store, the day after an almost apocalyptic wind storm (I do not want to play down the recent hurricanes in the Caribbean, but I haven´t yet experienced a big crane turning around by itself!), the ground was full of broken branches and twigs from the trees. I thought it would be a waste not to pick them and use them for our next crafts. In the shopping bag, I carried a purchased star which I intended to use for decorating the lighted pinecone Christmas tree. And so an idea of making twig stars with children crossed my mind. The tutorial is very simple and the final stage of the decoration can handle even the smallest!
Abychom poskytli co nejlepší služby, používáme k ukládání a/nebo přístupu k informacím o zařízení, technologie jako jsou soubory cookies. Souhlas s těmito technologiemi nám umožní zpracovávat údaje, jako je chování při procházení nebo jedinečná ID na tomto webu. Nesouhlas nebo odvolání souhlasu může nepříznivě ovlivnit určité vlastnosti a funkce.
Funkční
Always active
Technické uložení nebo přístup je nezbytně nutný pro legitimní účel umožnění použití konkrétní služby, kterou si odběratel nebo uživatel výslovně vyžádal, nebo pouze za účelem provedení přenosu sdělení prostřednictvím sítě elektronických komunikací.
Předvolby
Technické uložení nebo přístup je nezbytný pro legitimní účel ukládání preferencí, které nejsou požadovány odběratelem nebo uživatelem.
Statistiky
The technical storage or access that is used exclusively for statistical purposes.Technické uložení nebo přístup, který se používá výhradně pro anonymní statistické účely. Bez předvolání, dobrovolného plnění ze strany vašeho Poskytovatele internetových služeb nebo dalších záznamů od třetí strany nelze informace, uložené nebo získané pouze pro tento účel, obvykle použít k vaší identifikaci.
Marketing
Technické uložení nebo přístup je nutný k vytvoření uživatelských profilů za účelem zasílání reklamy nebo sledování uživatele na webových stránkách nebo několika webových stránkách pro podobné marketingové účely.